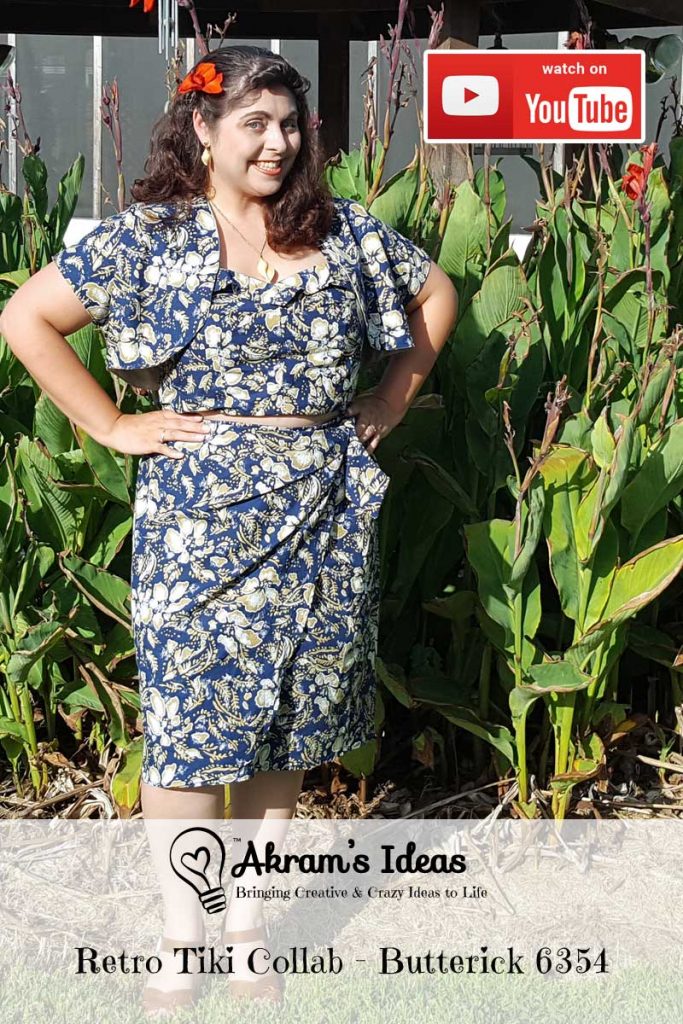
Today I have a very special project to share with you, my very first blogger collaboration project featuring pattern Butterick 6354 .
Retro Tiki Collab
This collaboration started with an email from Bianca from Vintage on Tap. Both of us had recently shared that we had bought the Butterick 6354 from the Patterns by Gertie line.
Bianca had a great idea to do a collaboration project and invited Abi from The Crafty Pinup and Christina from Gussets and Godets to join in.

This #RetroTikiCollab as we decided to call it would be a sort of blogger hop. We’d each sew up a version of Butterick 6354, each giving a different twist on the pattern.
Rocking the Original Pattern

My twist on this pattern was to basically rock the original, and make it as directed. This also would help to give a point of reference for creative changes that Bianca, Abi and Christina made to their pattern.
Sarong and Shorts
The Sarong and shorts went together as planed. Nothing too dramatic in its’ construction. Since I was under a time crunch I choose to pink the raw edges of the seams.

As for fitting adjustments, the sarong I used a ⅜ inch seam allowance, which I might have been able to increase, but I was worried about it being too small.

I sewed the seam allowance on the shorts at ½ inch to give it a little more room. Speaking of the shorts, I really like how they look and might make them again. I only wish they had pockets.
The Bolero
The bolero was another really easy make with the kimono style sleeves. I wish though the sleeves had been bigger. As with most sleeves I had to enlarge the opening to get my arm in.

For this pattern I sewed the seams at ½ inch instead of the standard ⅝ inch seam allowance. However, I feel like it could be a little looser around the underarm.

I lined the bolero as directed in the pattern, using a canvas colored cotton and even added my official sewing label to the inside.
Bustier and Boning
As I anticipated I had all sorts of fitting issues with my butier. I made a muslin to begin with and had to adjust from a size 16 grading to a 22 at the waist for the side seams.
I also read that the bustier is a little low for bustier ladies, so I cut the neckline at the size 22 which made it a bit higher and a little less revealing.

The front bustier pieces I sewed at the standard ⅝ inch seam allowance. The center dart was new to me and got it to line up the best I could.
I sewed the side seams at ½ inch. While the back zipper was sewing at ½ inch at the top and ⅝ inch at the bottom. I guess I have a bigger bust, cause I needed the extra room on top to get the zipper to close.

The front bustier band was easy to put together, but it doesn’t want to set quite right, something I noticed some of my #RetroTikiCollab mates also had issues with.
I bought 2 yards of Featherlite Boning for this project, since it was readily available at my local Joann Fabrics store. I used about a yard for this project.

The boning goes in pretty easy, just cut to length then remove the plastic bone from casing. Sew casing on to placement line sewing over casing stitches. Close one end of the casing then place the plastic bone inside, sew up other end.
Since the bones are wound in the package they want to curl on you making it a little difficult to put back in the casing. Also I wasn’t sure which direction to place the bones because they curled to one side. My husband suggested that the they should curl out so the rounded curve sets towards the body.

Lastly I added the halter top and sewed the seam at ⅜ inch, I also had to adjust the length to give a tighter set. I had some gaping issues on the bustier but most of those went away when I added the halter strap. I guess it helps pull everything closer to the body.
Completed Project
I’m glad to have been able to be apart of this #RetroTikiCollab with some super talented vintage sewers.

Back in May had already wanted to make a Gertie Pattern Butterick 6019 for my I Dream of Tiki / Hawaiian Dress Sew Along. While that project didn’t come into fruition, I can still say I was able to make a tiki dress (playsuit) in the end anyways.
Continue the Fun

I hope you enjoyed my make of Butterick 6354 for our #RetroTikiCollab , but remember the fun doesn’t end here. Be Sure to check out everyone else’s make:
- The Crafty Pinup – Abi’s Bustier-to-Skirt Pattern Hack
- Gussets and Godets – Christina’s Bustier-to-Shorts Pattern Hack
- Vintage on Tap – Bianca’s Reversible Version
GIVE AWAY
To make this #RetroTikiCollab even more fun I’m giving away 2-½ yards of great tiki inspired fabric. All you have to do is enter below, it’s that easy.

Contest is open to all US residents and ends at 11:59 pm on Thursday August 11th. Winners will be announced on August 12th and will be contacted via Instagram. See here for Terms and Conditions.


Hey! I really want to enter the contest to win that amazing fabric, but the form never loads. When I peek at the code, it says “Failed to load resource: the server responded with a status of 404 (Not Found)” — is there any other way I can enter? Thanks, and your version looks amazing! Hoping to make my own too!
Lauren sorry you’re having trouble. If you can let me know what your YouTube and Instagram usernames are and I will manually add you into the giveaway.
Just tried again and it did the trick this time! Started following you. It’s been a very tiki sewing summer. Thanks so much!
Good Luck 😉
Love your outfit! I’ve made the bustier and shorts as well but I have the opposite problem: not enough boobage! I think next time I might sew some bra cups in it…anywhoooo—your clothing tags are awesome! I’ve been thinking about getting some made. Looks so pro!
I’ve also noticed a tight armhole in many of Gertie’s patterns and I have really skinny arms! I tried making the 40’s camp shirt from her casual book and ended up making it sleeveless so I could hack the armhole waaaay bigger.
Another thing you can use for boning is industrial zip ties found at the hardware store in the electrical department. Cut off custom lengths, make a casing, and voila! It’s a lot cheaper if you use boning a lot, and a lot stronger.
Enjoyed all your makes—I hope you do another one next summer!
Jeanine thanks so much for your comment. I love your idea about using zip ties as boning, I think it’s great! I find the hardware store to have so many useful items for sewing, who’d have guessed. Thanks for sharing.
Sensational outfit (and collaboration)! I love that you opted for a darker hued pattern here. It captures the spirit of vintage Polynesian inspired looks, but adds a deeper sense of allure and elegance to the mix as well. Awesome make!
xoxo ♥ Jessica
Thanks Miss Jessica, I was torn at first whether to do a brighter floral fabric or this darker blue. In the end I’m really glad I choose the blue I really like the look of it.